In this tutorial you will learn about how to develop JSF 2 application with XHTML in Eclipse.
JSF 2 Eclipse XHTML Example
In this tutorial you will learn about how to develop JSF 2 application with XHTML in Eclipse.
Here I will give all the steps from naming a New Dynamic Web Project to creating XHTML files. And a Hello World Example which will demonstrate you how easy to work with the XHTML files. To create a JSF application with XHTML file in eclipse you may follow the following processes :
First of all make sure about the setup you are required to develop JSF 2 web application in Eclipse
- JDK 1.5 or its later version
- Eclipse (Java EE version)
- Tomcat (with Servlet 2.5 or its later version) with jsf-api.jar, jsf-impl.jar (and more as per requirements ) JAR files or any Java EE Server.
Here I am using jdk 1.6, Eclipse Helios, and Tomcat 7.0.20
Start the Eclipse and set its work space.
Now create a JavaServer Faces Project
1. File -> New -> Dynamic Web Project

2. Named the project (I have named Jsf2Xhtml) -> Go to Configuration and select from the drop down list Default Configuration for Apache Tomcat v7.0
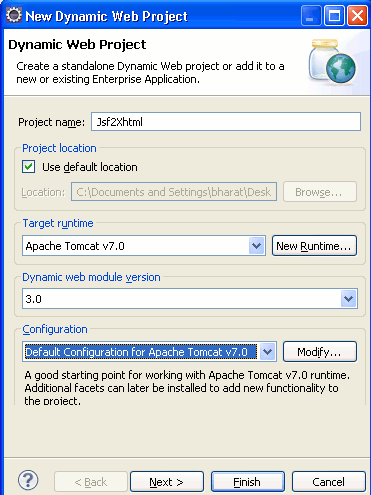
3. Now click on Modify button and check the checkboxes as checked in the image given below and then click the OK button.
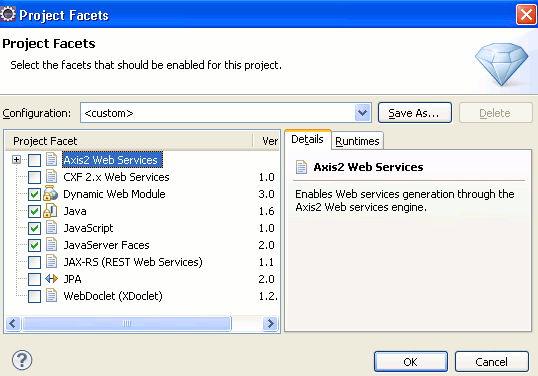
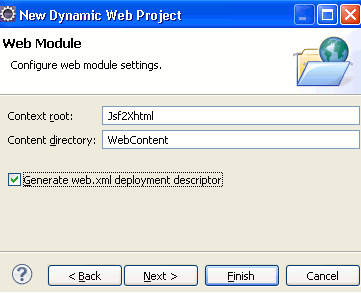
4. After clicking on OK button the Project Facets wizard will be completed and you will be returned to the New Dynamic Web Project dialog box in the existing wizard to do your remaining task. Now Click on Next button and after clicking on next button you will be entered to the next step and here if you want to add any folder on build path then select the AddFolder button and follow the steps otherwise skip it and click on Next button and check the checkbox for generating the web.xml file automatically otherwise skip this step and click on Next button. I want to generate the web.xml file automatically so, I have checked the checkbox.
5. After clicking on Next button a new step is required to follow, in this step the dialog box appears is for facilitating to add JSF capabilities. Here you can do either or both of the steps i.e if you have already downloaded the JSF jar files then click on the Managed libraries icon and follow the steps or you can download the jar files by clicking on Download library button and then follow the steps. Here I have downloaded (if not click here ) the JAR files earlier so, in the further steps I will do the steps to Managed libraries.
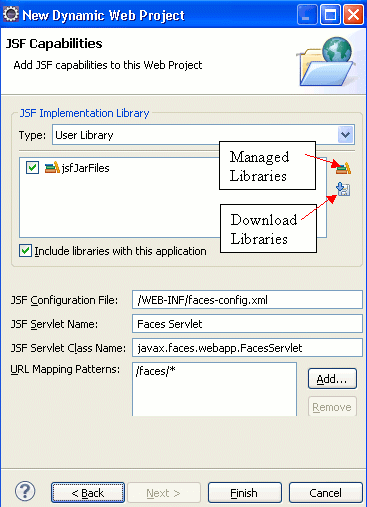
6. Now clicked on Finish button. After clicking on Finish the existing wizard will be completed and the Dynamic Web Project will be created by the name you have specified (as the image given below).

Till here you have done the basic works for developing the application. Now you will be required the XHTML file to create JSF pages and the templates. The steps given below is demonstrating about how to create the XHTML files for the JSF in Eclipse.
Step 1. For the convenient you may create Folders and named as you like. But remember to create JSF pages, folder should be created in the Web Content folder in Eclipse.
Right Click on the Web Content folder -> New -> Folder (specify the name of folder).
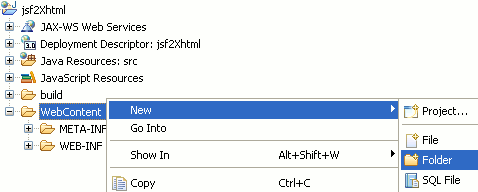
After Specifying the name of Folder click on Finish.
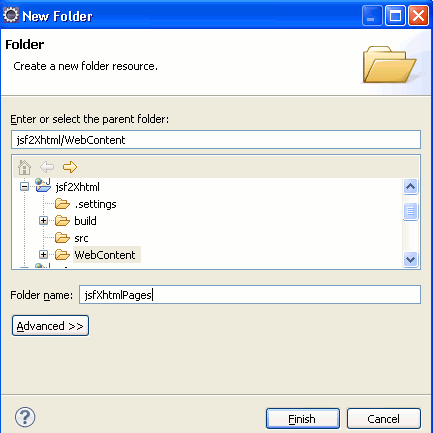
After clicked on Finish in the Web Content the new folder will be created by the name you have specified as below :
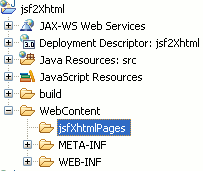
Now create the JSF pages in the specified folder by Right Click -> New -> HTML File

Then use the HTML wizard and named the file with .xhtml extension

And then Click on Next button and Select the New Facelet Composition Page.
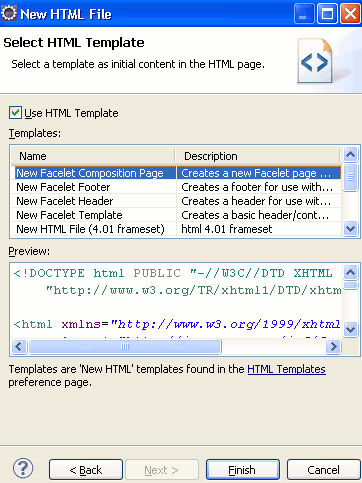
Now Click on Finish button. After clicked on Finish the Html wizard will be completed and you are able to create the JSF page. To create this page you will be required to write the JSF tags so edit this page. This page will automatically added the JSF core, html and facelets uri, and since here we will learn a very simple example and we will not write the facelets so, to edit this page I have removed the xmlns:ui="http://java.sun.com/jsf/facelets" uri and also deleted the tags related to this URI. Then used the JSF core and html tags as follows :
<!DOCTYPE html PUBLIC "-//W3C//DTD XHTML 1.0 Transitional//EN"
"http://www.w3.org/TR/xhtml1/DTD/xhtml1-transitional.dtd">

<html xmlns="http://www.w3.org/1999/xhtml"
xmlns:h="http://java.sun.com/jsf/html"
xmlns:f="http://java.sun.com/jsf/core">

<head>
<title>JSF Hello World</title>
</head>
<body>
<f:view>
<h:form>
<h2><h:outputText value="#{helloWorld.str}" /></h2>
</f:view>
</body>
</html>
Example :
Now you are able to create the example. Here I am giving a simple example which will demonstrate you about how to create a JSF application with XHTML files in Eclipse. Follow all the above processes from creating a New Dynamic Project to creating XHTML files. After successfully completion of the above all processes you will be required a Managed Bean, this is a simple Java Bean class and is made a managed bean by using the @ManagedBean annotation. In this example I will simply print a String JSF Hello World.
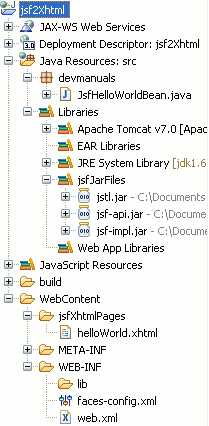
The complete Directory Structure of this example is as follows :
JsfHelloWorldBean.java
package devmanuals;
import javax.faces.bean.ManagedBean;

@ManagedBean(name="helloWorld")
public class JsfHelloWorldBean {
String str= "JSF Hello World";

public String getStr() {
return str;
}
}
helloWorld.xhtml
<!DOCTYPE html PUBLIC "-//W3C//DTD XHTML 1.0 Transitional//EN"
"http://www.w3.org/TR/xhtml1/DTD/xhtml1-transitional.dtd">

<html xmlns="http://www.w3.org/1999/xhtml"
xmlns:h="http://java.sun.com/jsf/html"
xmlns:f="http://java.sun.com/jsf/core">

<head>
<title>JSF Hello World</title>
</head>
<body>
<f:view>
<h2><h:outputText value="#{helloWorld.str}" /></h2>
</f:view>
</body>
</html>
web.xml
<?xml version="1.0" encoding="UTF-8"?>
<web-app xmlns:xsi="http://www.w3.org/2001/XMLSchema-instance" xmlns="http://java.sun.com/xml/ns/javaee" xmlns:web="http://java.sun.com/xml/ns/javaee/web-app_2_5.xsd" xsi:schemaLocation="http://java.sun.com/xml/ns/javaee http://java.sun.com/xml/ns/javaee/web-app_3_0.xsd" id="WebApp_ID" version="3.0">
<display-name>jsf2Xhtml</display-name>
<welcome-file-list>
<welcome-file>/jsfXhtmlPages/helloWorld.xhtml</welcome-file>
</welcome-file-list>
<servlet>
<servlet-name>Faces Servlet</servlet-name>
<servlet-class>javax.faces.webapp.FacesServlet</servlet-class>
<load-on-startup>1</load-on-startup>
</servlet>
<servlet-mapping>
<servlet-name>Faces Servlet</servlet-name>
<url-pattern>/faces/*</url-pattern>
</servlet-mapping>
<context-param>
<description>State saving method: 'client' or 'server' (=default). See JSF Specification 2.5.2</description>
<param-name>javax.faces.STATE_SAVING_METHOD</param-name>
<param-value>client</param-value>
</context-param>
<context-param>
<param-name>javax.servlet.jsp.jstl.fmt.localizationContext</param-name>
<param-value>resources.application</param-value>
</context-param>
<listener>
<listener-class>com.sun.faces.config.ConfigureListener</listener-class>
</listener>
<servlet-mapping>
<servlet-name>Faces Servlet</servlet-name>
<url-pattern>*.jsf</url-pattern>
</servlet-mapping>
<servlet-mapping>
<servlet-name>Faces Servlet</servlet-name>
<url-pattern>*.faces</url-pattern>
</servlet-mapping>
<servlet-mapping>
<servlet-name>Faces Servlet</servlet-name>
<url-pattern>*.xhtml</url-pattern>
</servlet-mapping>
</web-app>
And from the JSF 2.x beans can be managed by using annotation so, to manage the Managed Bean faces-config.xml file is not required.
How to Run this example
To run this example you will have first Start the server, and then you will have to write the URL http://localhost:8080/jsf2Xhtml/jsfXhtmlPages/helloWorld.xhtml in the address bar of a Web Browser.
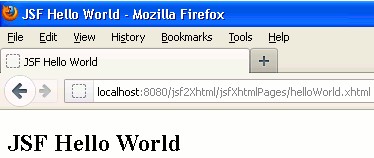
Output :
When you will deploy this example successfully on server the output will be as follows :
Download Source Code (Here I am giving a Source Code in WAR file, for your convenience. To run this example in Eclipse simple import this WAR file in your eclipse, set up the server and deploy it.)


[ 0 ] Comments