In this tutorial you will learn about the use of Annotation in JSF.
Java JSF Annotation
In this tutorial you will learn about the use of Annotation in JSF.
In JSF earlier versions (1.x) developers were required to write an additional configuration file named faces-config.xml to manage the bean and the navigation rule while they developed a JSF based application. That was the tiresome process for the developers. Release of JSF later versions (2.x) overcame this process and made the writing of faces-config.xml file optional. In these releases developers are allowed to manage the bean and navigation rule on the same page. In these releases a new feature is introduced named Annotation. Using Annotation you can managed beans, register a listener, render the resource etc. However use of annotations are also optional. Some of the Annotations are as follows :
- ApplicationScoped
- RequestScoped
- SessionScoped
- ViewScoped
- CustomScoped
- NoneScoped
- ManagedBean
- ManagedProperty
- ReferencedBean
All of the above annotations are of package javax.faces.bean.
Example :
Resources that I have used here for creating this example are as follows :
- Eclipse Helios
- apache-tomcat-7.0.20
- JDK 1.6
Here I am giving a simple example which will demonstrate you about how to use Annotation in JSF 2.0. In this example I have created an annotated Bean. To create this annotated Bean I have imported the package javax.faces.bean and used the @ManagedBean(name="nameBean) to manage the bean and @RequestScoped to confine the bean scope for a request. Then created an index page which will be called by default when you will deploy this example. In this page I have simply used the <jsp:forward> action which will forward the control to the inputname.jsp page, in this page simply taken an inputText tag of jsf html tag library to take the input dynamically and a commandButton of jsf html tag library which will result to the greeting.jsp page by submitting, in the greeting.jsp page I have used the outputText of jsf html tag library and get the dynamic value given at the inputname.jsp page. Then created a deployment descriptor file i.e web.xml for configuring the FacesServlet.
NOTE : ManagedBean can also be used without the name parameter, in this case it assumes the default name of Bean.
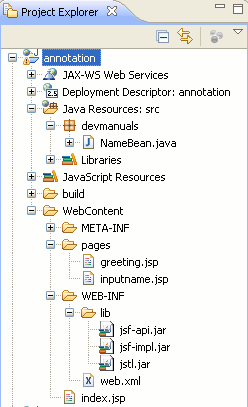
Directory Structure of this example is as follows :

NameBean.java
package devmanuals;
import javax.faces.bean.ManagedBean;
import javax.faces.bean.RequestScoped;

@ManagedBean(name="nameBean")
@RequestScoped

public class NameBean {

String name;

public String getName() {
return name;
}

public void setName(String name) {
this.name = name;
}
}
inputname.jsp
<%@ taglib uri="http://java.sun.com/jsf/html" prefix="h" %>
<%@ taglib uri="http://java.sun.com/jsf/core" prefix="f" %>
<html>
<head>
<title>Input page</title>
</head>
<body>
<f:view>
<h1>
<h:outputText value="Input page"/>
</h1>
<h:form>
<h:inputText value="#{nameBean.name}" />
<h:commandButton action="greeting" value="submit" />
</h:form>
</f:view>
</body>
</html>
greeting.jsp
<!DOCTYPE html PUBLIC "-//W3C//DTD HTML 4.01 Transitional//EN" "http://www.w3.org/TR/html4/loose.dtd">
<%@ page language="java" contentType="text/html; charset=ISO-8859-1" pageEncoding="ISO-8859-1"%>
<%@ taglib uri="http://java.sun.com/jsf/core" prefix="f" %>
<%@ taglib uri="http://java.sun.com/jsf/html" prefix="h" %>
<html>
<head>
<meta http-equiv="Content-Type" content="text/html; charset=ISO-8859-1">
<title>Insert title here</title>
</head>
<body>
<f:view>
Hello, <h:outputText value="#{nameBean.name}"/>!
</f:view>
</body>
</html>
web.xml
<?xml version="1.0" encoding="UTF-8"?>
<web-app xmlns:xsi="http://www.w3.org/2001/XMLSchema-instance"
xmlns="http://java.sun.com/xml/ns/javaee" xmlns:web="http://java.sun.com/xml/ns/javaee/web-app_2_5.xsd"
xsi:schemaLocation="http://java.sun.com/xml/ns/javaee http://java.sun.com/xml/ns/javaee/web-app_2_5.xsd"
id="WebApp_ID" version="2.5">

<listener>
<listener-class>com.sun.faces.config.ConfigureListener</listener-class>
</listener>

<context-param>
<param-name>javax.faces.STATE_SAVING_METHOD</param-name>
<param-value>server</param-value>
</context-param>

<context-param>
<param-name>javax.faces.CONFIG_FILES</param-name>
<param-value>/WEB-INF/faces-config.xml</param-value>
</context-param>

<!-- Servlet -->
<servlet>
<servlet-name>FacesServlet</servlet-name>
<servlet-class>javax.faces.webapp.FacesServlet</servlet-class>
<load-on-startup>1</load-on-startup>
</servlet>

<!-- Mapping Of Servlet -->
<servlet-mapping>
<servlet-name>FacesServlet</servlet-name>
<url-pattern>*.jsf</url-pattern>
</servlet-mapping>

</web-app>
How to run this example
I am giving here a war file for you to download the source code. Simply download the source code and import this war file by File -> import -> web -> WAR file -> Next -> Browse the file location -> Finish. Then deploy this example.
Output :
When you will deploy this example you will get the output as follows :
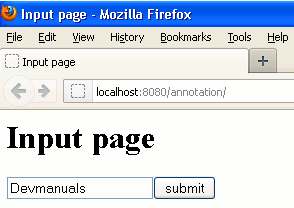
1. At first the index.jsp page will be executed and will be redirected to the inputname.jsf page. inputname.jsf page is a JSP page and this page will be mapped through servlet-mapping. Then the output will be as follows :

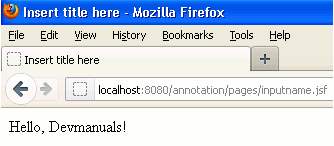
2. When you will input the value into the textbox and click on submit then the output will be as follows :


[ 0 ] Comments