
This video tutorial walks you through the steps of installing and configuring the JDK 8 on windows 7 computer. After completing the installation of the JDK 8 on Windows 7 it is necessary to configure the path and class path variables. This tutorial also explains the steps to configure the path and class path system variables.
Steps to install the JDK 8 on the Windows 7 computer
Here is the step by step tutorial for installing the JDK 8 on the Windows 7. Now the JDK 8 is the latest version of the Java development kit and developer should start learning its new features and experiment with the latest features of the JDK 8.
Well if you want to start the development with Java 8 (JDK 8) the first step would be to to JDK and install it on your computer. Installation and configuration steps of this version of JDK is same as of the JDK 7. Now we have created the video tutorial and added on this page which will show you the steps of installation and configuration.
The latest version of Java Development Tool or JDK can be found at Oracle Website. If you check the website you will find the download link of the latest JDK and other software's offered by Oracle.
Video tutorial of Downloading and Installing the JDK 8 on Windows7:
This video tutorial is the best explanation of JDK 8 installation on Windows 7. In this video you will see all the step of installing the JDK 8. Steps in the video also shows how to set the path and the CLASSPATH variables.
Here is the video:
How to Download and Install JDK 8 on Windows 7?
Here is the step by step guide to download the Java Development Kit 8 Windows 7.
Step 1: So, first of all download the JDK
As told above Java can be downloaded from the Oracle Website.
On the Oracle website select "Java Platform (JDK) 8u5" or the current version as shown below:

Now you will be presented with the following screen:
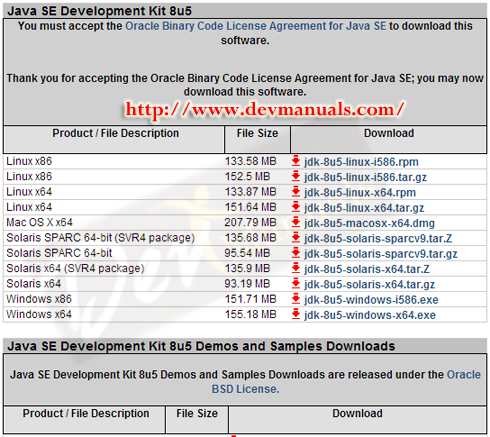
Accept the license and select the jdk-8u5-windows-i586.exe or jdk-8u5-windows-i64.exe in case your system is 64BIT.
Step 2: Install the JDK
One the download is competed you can start the installation.
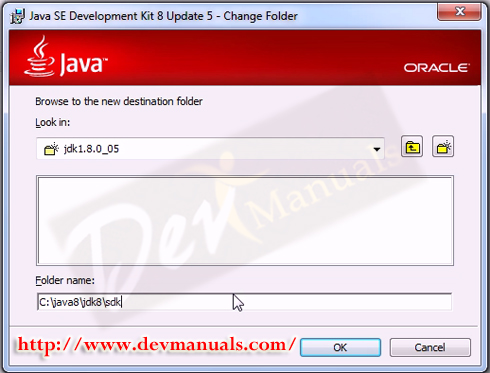
Now you should double click the installer and follow the installer to install the JDK. Installer will start installing the JDK. You have to provide the "Folder Name" for installing the JDK. You can provide any path or leave the default path as shown below:
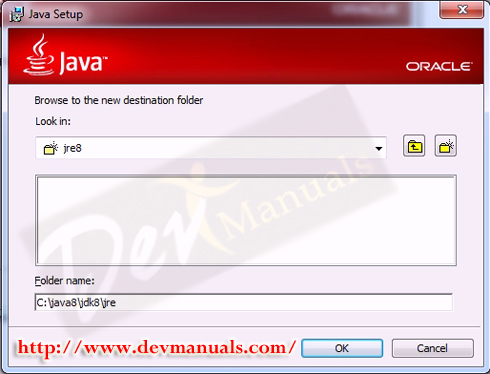
Now installer will as for the directory to install the JRE.
Java is most popular and it is installed in more than 3 Billion Devices.

Step 3: Configure JDK
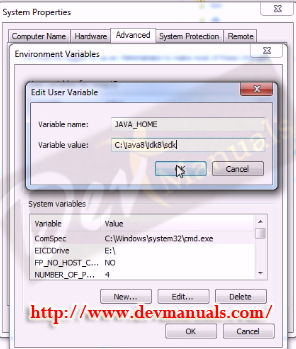
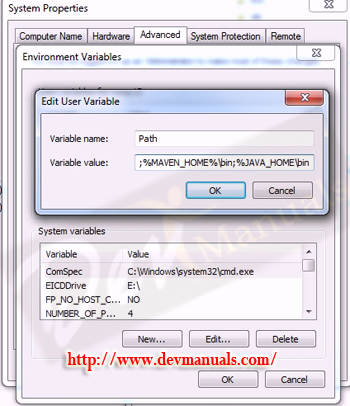
Now you should copy the complete directory path where you have installed the JDK. For example in my computer it is installed at "C:\java8\jdk8\". Now Open the system properties of windows.
And add path in the system path. Variable to be added:
JAVA_HOME=C:\java8\jdk8\ (Change it with your JDK installation path)
path=(other default values); JAVA_HOME\bin
Here is the screen shot of creating the JAVA_HOME system variable:
Here is the screen shot of setting the path variable.
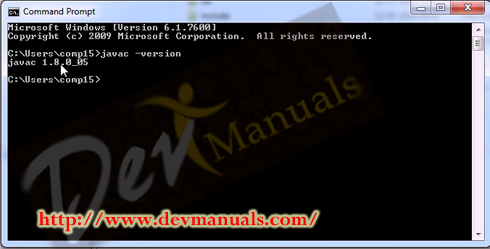
Step 4: Check the installation
Now you should go to the command prompt and type the java -version. This command should display the version of JDK on the console.
Here today you have learned the steps to download and install the JDK 8 on the Windows 7 operating system. After successfully installing and configuring the system you will move on and start developing your first Java program.
It will also teach you to test your installing of JDK by opening the command prompt and then typing the java -version command. In the video there is output of above command you should mach it with the output coming on your computer.
Check the index page of JDK tutorial and chose the tutorial you want to learn next.
[ 0 ] Comments