In this tutorial you will learn about the
JSF 2 f event Tag
In this tutorial you will learn about the <f:event> tag in JSF 2.
In JSF 2 the tag <f:event> and the annotation @NamedEvent made the event system more desirable. JSF 2 f event tag facilitates the developer to apply a ComponentSystemEventListener on the component in a JSF page. This tag can be added to any desired component with the attributes type and listener. This tag is used for handling some event when the action is performed on the specified component before rendered the component. For example, you want to execute some logical processes that are written in the backend when a component is rendered. In other word we can say that the developer can create their own custom events. Before evaluating the custom events JSF checks for the name of event and/or its corresponding event type (listed below) for which the listener action is registered or the full name of the Java class that extends the javax.faces.event.ComponentSystemEvent class that may be used as the "type" attribute of this tag.
NOTE : In JSF 2.0 version name attribute were used in place of type attribute.
List of the valid event name and its corresponding event type
| Valid Event Name | Type of the Event |
|---|---|
| preRenderComponent | javax.faces.event.PreRenderComponentEvent |
| preRenderView | javax.faces.event.PreRenderViewEvent |
| PostAddToView | javax.faces.event.PostAddToViewEvent |
| preValidate | javax.faces.event.PreValidateEvent |
| postValidate | javax.faces.event.PostValidateEvent |
Attributes of f:event tag
- type : This is a required attribute that specifies the name
of the event sent to listener method. These value can be the valid event name or
its corresponding event type given in the above table. Except these above
values, this attribute may use the fully qualified class name of the Java class
which extends the javax.faces.event.ComponentSystemEvent class.
- listener : This is a required attribute. This attribute evaluates an expression. The expression that this attribute evaluates is a public method which return type is a void and takes a ComponentSystemEvent parameter, or this method can also be a public method which return type is also a void but it doesn't take the argument in this case the method can't know about the event from where it came, this type of methods are used where a notification of event happening is required.
Example :
Here I am giving a simple example which will demonstrate you about how to use the JSF 2 f event tag. In this example I have used the method that takes the ComponentSystemEvent parameter. First of all to create the example of <f:event> tag we will required to some basic set up these set up are the JDK 1.5 or later version, a web server that supports the Java EE 6 specification, JSF jars, and the Java EE editor (for the convenience) to develop the application. I did set up of Apache Tomcat server 7.0.20, Eclipse Helios and the jsf-api.jar, jsf-impl.jar, and the jstl.jar. Now lets start, At first created a New Web Dynamic Project and add the JSF capabilities to it and generated the web.xml file through the editor (if don't know how click here). Now created a Java Bean class in a package (here I have named devmanuals) in the src folder in Eclipse. This class contains a data member "name" and its setter getter method as well as it also contains a public void method named preRenderValidationName that takes a ComponentSystemEvent parameter. In this method wrote the code for run in the backend which will check for the null value of textbox and it will return the message when a event will happened. Then created a folder named xhtmlPages in the Web Content folder in Eclipse and created the JSF pages. The first page inputPage.xhtml is containing the <h:inputText> to enter the value and a commandButton which will perform the action after click. And the second page outputPage.xhtml is containing the <h:outputText> to show the output, <f:event> tag to apply the ComponentSystemEventListener on this <h:outputText> tag, <h:message> tag to show the message and a simple <h:commandButton> which will send to the inputPage.xhtml when clicked. And in the web.xml file changed the welcome-file list (changes in the welcome-file list can be seen in the source code given below).
Directory Structure of this example

JsfEventBean.java
package devmanuals;
import javax.faces.application.FacesMessage;
import javax.faces.bean.ManagedBean;
import javax.faces.bean.RequestScoped;
import javax.faces.component.UIComponent;
import javax.faces.context.FacesContext;
import javax.faces.event.ComponentSystemEvent;


@ManagedBean(name="eventBean")
@RequestScoped
public class JsfEventBean {
private String name;
public String getName() {
return name;
}
public void setName(String name) {
this.name = name;
}
public void preRenderValidationName(ComponentSystemEvent cse)
{
FacesContext fc = FacesContext.getCurrentInstance();
UIComponent components = cse.getComponent();
if("".equals(name) || name== null)
{
FacesMessage msg =
new FacesMessage("Textbox must not be null. Please enter the name");
msg.setSeverity(FacesMessage.SEVERITY_ERROR);
fc.addMessage(components.getClientId(), msg);
fc.renderResponse();
}
}
}
inputPage.xhtml
<!DOCTYPE html PUBLIC "-//W3C//DTD XHTML 1.0 Transitional//EN"
"http://www.w3.org/TR/xhtml1/DTD/xhtml1-transitional.dtd">

<html xmlns="http://www.w3.org/1999/xhtml"
xmlns:h="http://java.sun.com/jsf/html"
xmlns:f="http://java.sun.com/jsf/core">

<f:view>
<h:form>
Enter Your Name :
<h:inputText value="#{eventBean.name}">
</h:inputText>
<h:commandButton action="outputPage" value="Submit" />
</h:form>
</f:view>
</html>
outputPage.xhtml
<!DOCTYPE html PUBLIC "-//W3C//DTD XHTML 1.0 Transitional//EN"
"http://www.w3.org/TR/xhtml1/DTD/xhtml1-transitional.dtd">

<html xmlns="http://www.w3.org/1999/xhtml"
xmlns:h="http://java.sun.com/jsf/html"
xmlns:f="http://java.sun.com/jsf/core">

<h:body>
<h:form>
<h:panelGrid id="outText">
<h:message for="outText" style="color:red;" />
Welcome <h:outputText value="#{eventBean.name}">
</h:outputText>
<f:event listener="#{eventBean.preRenderValidationName}" type="preRenderComponent"></f:event>
</h:panelGrid>
<h:commandButton value="Go Back" action="inputPage"></h:commandButton>
</h:form>
</h:body>
</html>
web.xml
<?xml version="1.0" encoding="UTF-8"?>
<web-app xmlns:xsi="http://www.w3.org/2001/XMLSchema-instance" xmlns="http://java.sun.com/xml/ns/javaee" xmlns:web="http://java.sun.com/xml/ns/javaee/web-app_2_5.xsd" xsi:schemaLocation="http://java.sun.com/xml/ns/javaee http://java.sun.com/xml/ns/javaee/web-app_3_0.xsd" id="WebApp_ID" version="3.0">
<display-name>jsfEvent</display-name>
<welcome-file-list>
<welcome-file>/xhtmlPages/inputPage.xhtml</welcome-file>
</welcome-file-list>
<servlet>
<servlet-name>Faces Servlet</servlet-name>
<servlet-class>javax.faces.webapp.FacesServlet</servlet-class>
<load-on-startup>1</load-on-startup>
</servlet>
<servlet-mapping>
<servlet-name>Faces Servlet</servlet-name>
<url-pattern>/faces/*</url-pattern>
<url-pattern>*.jsf</url-pattern>
<url-pattern>*.xhtml</url-pattern>
</servlet-mapping>
<context-param>
<description>State saving method: 'client' or 'server' (=default). See JSF Specification 2.5.2</description>
<param-name>javax.faces.STATE_SAVING_METHOD</param-name>
<param-value>client</param-value>
</context-param>
<context-param>
<param-name>javax.servlet.jsp.jstl.fmt.localizationContext</param-name>
<param-value>resources.application</param-value>
</context-param>
<listener>
<listener-class>com.sun.faces.config.ConfigureListener</listener-class>
</listener>
<servlet-mapping>
<servlet-name>Faces Servlet</servlet-name>
<url-pattern>*.faces</url-pattern>
</servlet-mapping>
</web-app>
How to Run this example
At first Start the server the select your project -> Right Click -> Run on Server. URL of will be http://localhost:8080/jsfEvent/xhtmlPages/outputPage.jsf
Output :
When you will execute the above example an output will be as follows
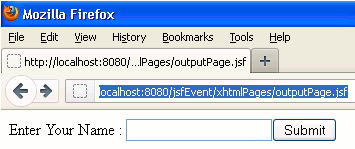
1. At first the inputPage.xhtml will be executed and the page will be look as follows :

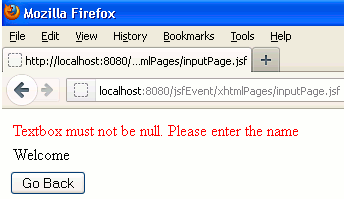
2. When the value is not entered into the textbox and clicked on "Submit" then the output will be as follows :

Above output is came when the value is not given to the textbox and the button is clicked, the action is performed but before the component rendered on the output page a listener is registered for the event so this listener will call the event using <f:event> from the class JsfEventBean and bound the event message.
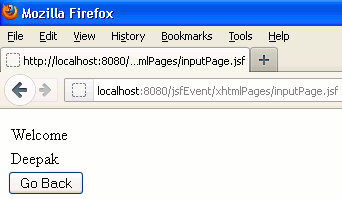
3. Now click to "Go Back" this will again transfer your control to the input page. Now this time enter some text and click on "Submit" then the output will be as follows :


[ 0 ] Comments