In this tutorial you will learn about JSF core tag attribute.
JSF 2 core tag attribute Example
In this tutorial you will learn about JSF core tag attribute.
attribute tag of JSF core tag library is used to add attribute to the UIComponent. This tag adds the attribute name and its value to its closest parent UIComponent when this tag is nested by the other parent tag.
Attributes of attribute tag
- name : This is not a required attribute to be used when
using this tag. This is used to specify the name of the attribute of component.
for example : <h:commandButton value="" /> can be written as <h:commandButton> <f:attribute name="value" /> </h:commandButton>
- value : This is not a required attribute to be used when
using this tag. This is used to specify the value of the attribute of component
which is named by the name attribute of this tag.
for example : <h:commandButton value="SUBMIT" /> can be written as <h:commandButton> <f:attribute name="value" value="SUBMIT" /> </h:commandButton>
You may use this tag when you are required to assign a specific name to the UIComponent and its value. It is assigned as key/value pair of Map. Remember if you are using it as a tree it will assign the name and value to its closest parent tag.
for example :
<h:commandButton value="Submit" action="userOutput" actionListener="#{nameBean.aListener}">
<f:attribute name="userName" value="bipul"/>
And its value can be fetched from the listener class as follows :
public void aListener(ActionEvent e)
{
name = (String)e.getComponent().getAttributes().get("userName");
}
From here the value will be returned as "bipul".
Example :
Here I am giving a simple example which will demonstrate you about how to use the <f:attribute> tag of JSF core tag library. To do so we will give a complete running example for you. So, in this example at first I have created a dynamic web project and then created a simple Java bean class that contains a data member (attribute) name and the setter getter methods to set and get the value of this data member, into a package named devmanuals into the Eclipse src folder. Then created a folder jspPages into the eclipse WebContent folder to keep the JSP pages. There are two JSP pages in this folder one of them named userInput.jsp that contains the form, inputText, outputText, commandButton, tags of JSF html tag library and the view, attribute of JSF core tag library. The html tags form is used for generating a form it is similar as the <form></form> tag in HTML pages, inputText is used for generating a textbox to take the input through user, outputText is used to show the output and the commandButton is used for submitting the form. The core tags view is used as a container of the component actions used on a page, attribute is used for specifying the commandButton (in this example) attribute's name and its value. And the second one JSP page named userOutput.jsp contains the outputText tag of the JSF html tag library and the view tag of JSF core tag library. Then created a web.xml file for mapping the Servlet, FacesServlet. And finally a index.jsp page in the WebContent folder in Eclipse which will be called first by the container. In this page I have used the <jsp:forward> action to transfer this control to the userInput.jsf page, actually userInput.jsf page is a JSP page about which we have been discussed above. The control will be transferred to this page using the help of url-mapping done at the web.xml file. Because I am using the Eclipse Helios 3.6.0 that supports the Servlet 3.0 Specifications i.e it supports Annotations by default so it doesn't create the web.xml file automatically. So, you will be required to create this file manually or you can generat the web.xml file through eclipse at the time when you are starting to create a dynamic project and naming this project in Eclipse by the following steps :
1. Start the Eclipse and specify the work space.
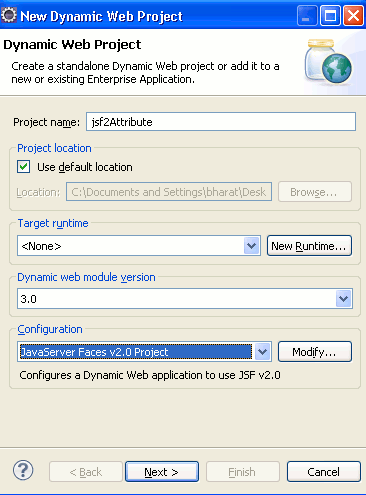
2. File -> New -> Dynamic Web Project
3. Specify the project name (naming the project)
4. Then Go to the Configuration -> Select the JavaServer Faces v2.0 Project from the dropdown list.

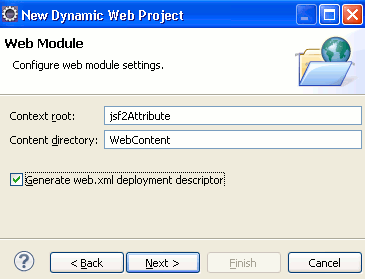
5. Click on Next -> Next
6. Select the check box to Generate web.xml deployment descriptor

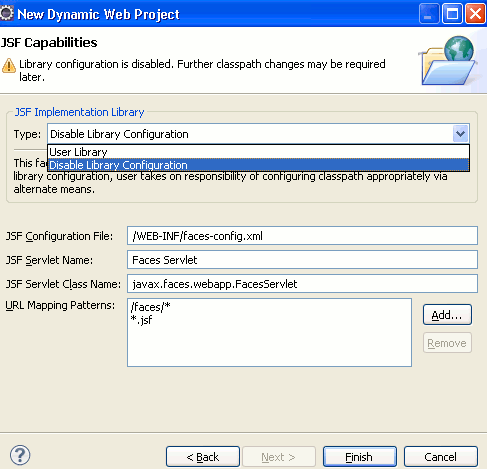
7. At this stage your web.xml file will be created and next Click on Next and select the user library from the dropdown list if you want to add the JAR files other wise select Disable Library Configuration and then click on Finish. After clicking on Finish button your faces-config.xml file will be created in your the WEB-INF folder. And then create your other files in the specified folder, such as Java bean class, JSP files etc. And if you want to add the JAR files in your project from here follow form the step 8.

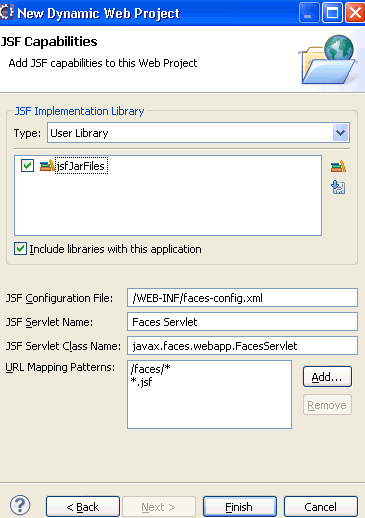
8. If you want to add the JAR files select the User Library click on Manage libraries icon located in the right side of the textarea box

9. Click on New -> Specify the name of folder -> Ok

10. Then select appropriate Managed libraries folder and click on Add JARs -> Browse the JAR file path where you have kept after downloading the JAR files. if not downloaded, download form here

11. Click on Ok -> Check the checkbox the user library you have created and then click on Finish.

Now you are ready to create your application. And you can create the other files as your requirement and or as I have explained earlier in this example.
Directory structure of this example

NameBean.java
package devmanuals;
import javax.faces.bean.ManagedBean;
import javax.faces.bean.RequestScoped;
import javax.faces.event.ActionEvent;

@ManagedBean(name="nameBean")
@RequestScoped

public class NameBean
{
String name;

public String getName() {
return name;
}

public void setName(String name) {
this.name = name;
}
// public void aListener(ActionEvent e)
// {
// name = (String)e.getComponent().getAttributes().get("userName");
// }
}
userInput.jsp
<%@ page language="java" contentType="text/html; charset=ISO-8859-1"
pageEncoding="ISO-8859-1"%>
<%@ taglib uri="http://java.sun.com/jsf/core" prefix="f" %>
<%@ taglib uri="http://java.sun.com/jsf/html" prefix="h" %>
<!DOCTYPE html PUBLIC "-//W3C//DTD HTML 4.01 Transitional//EN" "http://www.w3.org/TR/html4/loose.dtd">
<html>
<head>
<title>User Input Page</title>
</head>
<body>
<f:view>
<h:form>
Enter your name here :<h:inputText value="#{nameBean.name}"/>
<h:commandButton action="userOutput" >
<f:attribute name="value" value="SUBMIT" />
</h:commandButton>
</h:form>
</f:view>
</body>
</html>
userOutput.jsp
<%@ page language="java" contentType="text/html; charset=ISO-8859-1"
pageEncoding="ISO-8859-1"%>
<%@ taglib uri="http://java.sun.com/jsf/core" prefix="f" %>
<%@ taglib uri="http://java.sun.com/jsf/html" prefix="h" %>
<!DOCTYPE html PUBLIC "-//W3C//DTD HTML 4.01 Transitional//EN" "http://www.w3.org/TR/html4/loose.dtd">
<html>
<head>
<meta http-equiv="Content-Type" content="text/html; charset=ISO-8859-1">
<title>User Output Page</title>
</head>
<body>
<f:view>
Welcome, <h:outputText value="#{nameBean.name}"/> !
</f:view>
</body>
</html>
index.jsp
<%@ page language="java" contentType="text/html; charset=ISO-8859-1"
pageEncoding="ISO-8859-1"%>
<!DOCTYPE html PUBLIC "-//W3C//DTD HTML 4.01 Transitional//EN" "http://www.w3.org/TR/html4/loose.dtd">
<html>
<head>
<meta http-equiv="Content-Type" content="text/html; charset=ISO-8859-1">
<title>Home</title>
</head>
<body>
<jsp:forward page="/jspPages/userInput.jsf"></jsp:forward>
</body>
</html>
web.xml
<?xml version="1.0" encoding="UTF-8"?>
<web-app xmlns:xsi="http://www.w3.org/2001/XMLSchema-instance" xmlns="http://java.sun.com/xml/ns/javaee" xmlns:web="http://java.sun.com/xml/ns/javaee/web-app_2_5.xsd" xsi:schemaLocation="http://java.sun.com/xml/ns/javaee http://java.sun.com/xml/ns/javaee/web-app_3_0.xsd" id="WebApp_ID" version="3.0">
<display-name>jsfAttribute</display-name>
<welcome-file-list>
<welcome-file>index.html</welcome-file>
<welcome-file>index.htm</welcome-file>
<welcome-file>index.jsp</welcome-file>
<welcome-file>default.html</welcome-file>
<welcome-file>default.htm</welcome-file>
<welcome-file>default.jsp</welcome-file>
</welcome-file-list>
<servlet>
<servlet-name>Faces Servlet</servlet-name>
<servlet-class>javax.faces.webapp.FacesServlet</servlet-class>
<load-on-startup>1</load-on-startup>
</servlet>
<servlet-mapping>
<servlet-name>Faces Servlet</servlet-name>
<url-pattern>/faces/*</url-pattern>
<url-pattern>*.jsf</url-pattern>
</servlet-mapping>
<context-param>
<description>State saving method: 'client' or 'server' (=default). See JSF Specification 2.5.2</description>
<param-name>javax.faces.STATE_SAVING_METHOD</param-name>
<param-value>client</param-value>
</context-param>
<context-param>
<param-name>javax.servlet.jsp.jstl.fmt.localizationContext</param-name>
<param-value>resources.application</param-value>
</context-param>
<listener>
<listener-class>com.sun.faces.config.ConfigureListener</listener-class>
</listener>
<servlet-mapping>
<servlet-name>Faces Servlet</servlet-name>
<url-pattern>*.faces</url-pattern>
</servlet-mapping>
</web-app>
faces-config.xml (However in this example this file is not required but it is auto generated by eclipse)
<?xml version="1.0" encoding="UTF-8"?>

<faces-config
xmlns="http://java.sun.com/xml/ns/javaee"
xmlns:xsi="http://www.w3.org/2001/XMLSchema-instance"
xsi:schemaLocation="http://java.sun.com/xml/ns/javaee http://java.sun.com/xml/ns/javaee/web-facesconfig_2_0.xsd"
version="2.0">

</faces-config>
How to run this example
At first start your server then write the url address on the browser as follows :
http://localhost:8080/jsfAttribute/
Output :
1. When you will execute this example at first the page will be displayed on your browser and will ask you to enter your name in the specified text box as follows :

2. When you will enter the value as above and clicked on the button named "SUBMIT" output will be displayed on the browser as follows :

Download Source Code (Here I am giving a war file of this example for your simplicity, that you can easily import (File -> import -> Web -> WAR file -> browse to your specified path where you have kept this war file) it on your eclipse and can deployed.


[ 0 ] Comments