In this tutorial, you will learn how to use Hibernate 3 with Spring3 MVC.
Spring 3 MVC Hibernate Example
In this tutorial, you will learn how to use Hibernate 3 with Spring3 MVC. We uses annotation to make our application development convenient and faster. You will get here the brief explanation plus source code with jar files.
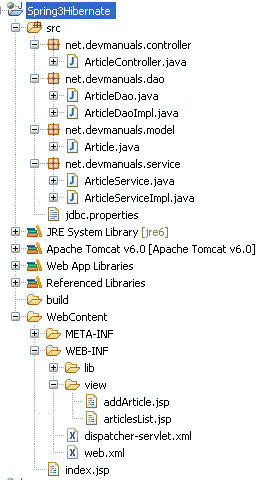
The hierarchical structure of the application directory is given below :
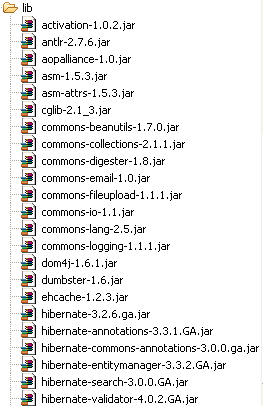
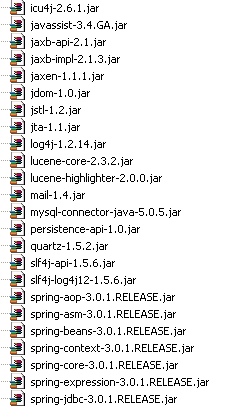
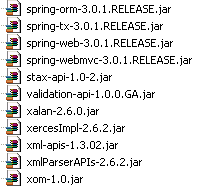
jar file used in the application is given below :
 |
 |
 |
The query for creating database table in Mysql is given below :
create database if not exists `spring_ankDb`;

USE `spring_ankDb`;

CREATE TABLE `article` (
`article_id` bigint(20) NOT NULL auto_increment,
`article_name` varchar(20) NOT NULL,
`article_desc` text NOT NULL,
`date_added` datetime default NULL,
PRIMARY KEY (`article_id`)
)
Application Flow :
When you execute the application, the first page will be :

When click on first link it will show you, the previously stored articles as below :
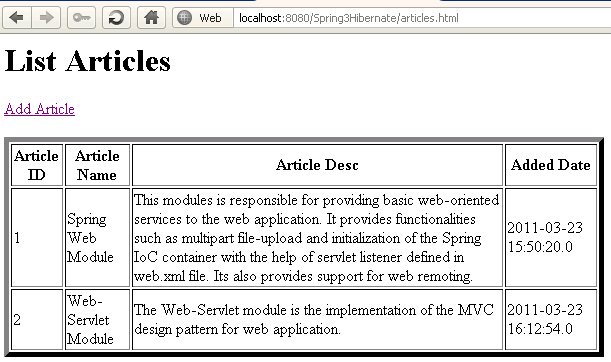
If you click on Add Article hyperlink it will show you the following page :
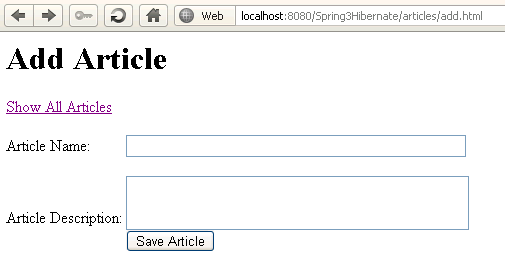
After clicking Save Article Button, it will redirect you to the articles.html page , which shows articles saved.
XML Files Used
web.xml
<?xml version="1.0" encoding="UTF-8"?>
<web-app version="2.5" xmlns="http://java.sun.com/xml/ns/javaee"
xmlns:xsi="http://www.w3.org/2001/XMLSchema-instance"
xsi:schemaLocation="http://java.sun.com/xml/ns/javaee http://java.sun.com/xml/ns/javaee/web-app_2_5.xsd">

<servlet>
<servlet-name>dispatcher</servlet-name>
<servlet-class>org.springframework.web.servlet.DispatcherServlet</servlet-class>
<load-on-startup>1</load-on-startup>
</servlet>

<servlet-mapping>
<servlet-name>dispatcher</servlet-name>
<url-pattern>*.html</url-pattern>
</servlet-mapping>

<welcome-file-list>
<welcome-file>index.jsp</welcome-file>
</welcome-file-list>

</web-app>
dispatcher-servlet.xml
<?xml version="1.0" encoding="UTF-8"?>
<beans xmlns="http://www.springframework.org/schema/beans"
xmlns:xsi="http://www.w3.org/2001/XMLSchema-instance" xmlns:context="http://www.springframework.org/schema/context"
xmlns:tx="http://www.springframework.org/schema/tx"
xsi:schemaLocation="
http://www.springframework.org/schema/beans
http://www.springframework.org/schema/beans/spring-beans-3.0.xsd
http://www.springframework.org/schema/context
http://www.springframework.org/schema/context/spring-context-3.0.xsd
http://www.springframework.org/schema/tx
http://www.springframework.org/schema/tx/spring-tx-3.0.xsd">

<context:property-placeholder location="classpath:jdbc.properties" />
<context:component-scan base-package="net.devmanuals" />

<tx:annotation-driven transaction-manager="hibernateTransactionManager" />

<bean id="jspViewResolver"
class="org.springframework.web.servlet.view.InternalResourceViewResolver">
<property name="viewClass"
value="org.springframework.web.servlet.view.JstlView" />
<property name="prefix" value="/WEB-INF/view/" />
<property name="suffix" value=".jsp" />
</bean>

<bean id="dataSource"
class="org.springframework.jdbc.datasource.DriverManagerDataSource">
<property name="driverClassName" value="${database.driver}" />
<property name="url" value="${database.url}" />
<property name="username" value="${database.user}" />
<property name="password" value="${database.password}" />
</bean>

<bean id="sessionFactory"
class="org.springframework.orm.hibernate3.annotation.AnnotationSessionFactoryBean">
<property name="dataSource" ref="dataSource" />
<property name="annotatedClasses">
<list>
<value>net.devmanuals.model.Article</value>
</list>
</property>
<property name="hibernateProperties">
<props>
<prop key="hibernate.dialect">${hibernate.dialect}</prop>
<prop key="hibernate.show_sql">${hibernate.show_sql}</prop>
</props>
</property>
</bean>

<bean id="hibernateTransactionManager"
class="org.springframework.orm.hibernate3.HibernateTransactionManager">
<property name="sessionFactory" ref="sessionFactory" />
</bean>
</beans>
Note : You get the rest of the code by downloading Source Code below.


[ 0 ] Comments