This section contains the details about the Configuring Eclipse to Tomcat 6.
Configuring Tomcat 6 to Eclipse
Eclipse IDE(Integrated development environment) is multi-language software development Environment with an extensible plugin system. The IDE is often called Eclipse ADT for Ada, Eclipse CDT for C/C++, Eclipse JDT for Java, and Eclipse PDT for PHP.
Here we will use Eclipse Galileo IDE for Java or Eclipse Galileo JDT for demonstration. Following are the steps needed to configure Tomcat to Eclipse :
Step 1 : First you need to download eclipse IDE from http://www.eclipse.org/galileo/ and Tomcat from http://tomcat.apache.org/download-60.cgi .
Step 2 :
- Install Tomcat and extract Eclipse.
- After extracting eclipse, run it by clicking it's exe file. It doesn't need installation.
- When you will run it, it will ask for creating a workspace. This workspace is actually your working directory ,where all the programs created by you ,with the help of Eclipse, will be saved.
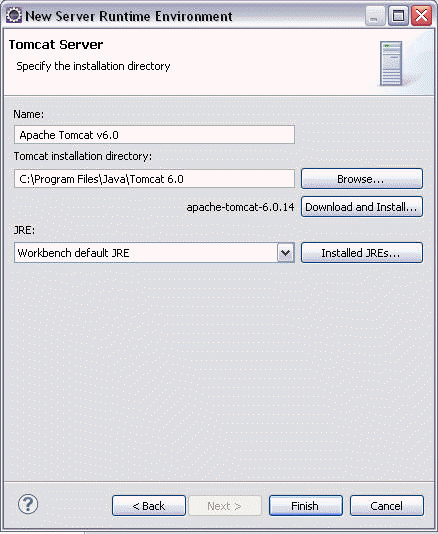
Step 3 : Select the option from menu bar as : window > Preferences. When you click on Preferences, you will see a configuration box. Select the option Server>Runtime Environments. as given below :

Step 4 : Click on the add button, select Apache Tomcat 6, and click next after that :

Step 5 :Click Next button, browse on your disk and choose the directory where you previously extracted Tomcat. In my case it?s /opt/tomcat6. Finally click Finish :
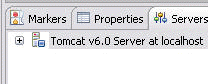
In the Servers panel, you will see the Tomcat you just added as given below :
After configuring Tomcat server with Eclipse, you can run it directly by right click on your program and selecting "run as " > "run on server" or by running through shortcut. or menu bar options.
[ 0 ] Comments