In this tutorial you will learn about the JSF 2 h message tag.
JSF 2 html message
In this tutorial you will learn about the JSF 2 h message tag.
<h:message> tag of JSF HTML tag library is used to display message for the concerned component. These messages can referred to the type of its severity i.e. an error, information message. These generated messages can also be customized by applying the different CSS styles.
Attributes of <h:message>
- for : This is a required attribute. This attribute specifies the id of the concerned component for which message has to be displayed.
- id : This is not a required attribute. This attribute acted
as a component's identifier. If this attribute is used it makes the component
uniquely identifiable inside it's closest parent.
- rendered : This is not a required attribute. It evaluates a
boolean expression. Presence of this attribute specifies that whether the
current component should be rendered in the Rendered Response phase or not or
worked on any later form submission. The default value of this attribute is
defined to true.
- showDetail : This is not a required attribute. This
attribute evaluates to a boolean value that specifies whether the message should
be displayed in detail or not. The default value of this attribute is 'true'.
- showSummary : This is not a required attribute. This
attribute evaluates to a boolean value that specifies whether the message should
be displayed as a summary or not. The default value of this attribute is
'false'.
- dir : This is not a required attribute that
evaluates to the java.lang.String value which suggests the direction for the text
that doesn't inherit the property of maintaining a direction
(directionality). The allowable
values are "LTR (Left-to-Right)" and "RTL (Right-to-Left)".
- errorClass : This is not a required attribute. Using this attribute CSS style class can be applied to the displayed error messages.
- errorStyle : This is not a required attribute. Using this attribute CSS style(s) can be applied to the error messages that has to be displayed.
- fatalClass : This is not a required attribute. Using this attribute CSS style class can be applied to the fatal messages that has to be displayed.
- fatalStyle : This is not a required attribute. Using this attribute CSS style(s) can be applied to the fatal messages that has to be displayed.
- infoClass : This is not a required attribute. Using this attribute CSS style class can be applied to the information messages that has to be displayed.
- infoStyle : This is not a required attribute. Using this attribute CSS style(s) can be applied to the information messages that has to be displayed.
- lang : This is not a required attribute. This attribute is used to specify the language code for the component.
- style : This is not a required attribute but, is used to specify the CSS style will be applied to this component when rendered.
- styleClass : This is not a required attribute but, is used to specify the applicable CSS style space-separated list to be applied at the time of rendering.
- title : This is not a required attribute. This attribute is used to specify the title information which will be displayed as tooltip about markup elements.
- tooltip : This is not a required attribute. This attribute
evaluates to a boolean value which specifies whether the message should be
displayed in detail as tooltip text or not.
- warnClass : This is not a required attribute. Using this attribute CSS style class can be applied to the warning messages.
- warnStyle : This is not a required attribute. Using this attribute CSS style(s) can be applied to the warning message.
- binding : This is not a required attribute. This attribute evaluates to a javax.faces.component.UIComponent specified for linking the component with the property of backing bean.
Example :
In this example you will see that how a JSF 2 h message tag can be used in the JSF applications. Here I am giving the complete details of code of this example. In this example I have created a JavaBeans class with the name property and its setter getter method and the property message with getter method only. Then I have created the JSF page input.xhtml where I have used the <h:inputText> tag for the input field and used the <h:message> tag to displayed message. In the other JSF page named output.xhtml is the output page.
Directory Structure

UserBean.java
package devmanuals;

import javax.faces.bean.ManagedBean;
import javax.faces.bean.RequestScoped;

@ManagedBean(name="userBean")
@RequestScoped
public class UserBean {

String name;
String message="Name field is required";

public String getName() {
return name;
}
public void setName(String name) {
this.name = name;
}
public String getMessage() {
return message;
}
}
input.xhtml
<!DOCTYPE html PUBLIC "-//W3C//DTD XHTML 1.0 Transitional//EN"
"http://www.w3.org/TR/xhtml1/DTD/xhtml1-transitional.dtd">

<html xmlns="http://www.w3.org/1999/xhtml"
xmlns:h="http://java.sun.com/jsf/html"
xmlns:f="http://java.sun.com/jsf/core">

<head>
<title>JSF 2 html message</title>
</head>
<body>
<f:view>
<h3>User Detail</h3>
<h:form>
<table>
<tr>
<th><h:outputText value="Enter Your Name : "/></th>
<td><h:inputText id="text1" value="#{userBean.name}" required="true" label="Name" requiredMessage="#{userBean.message}"/> <br/></td>
</tr>
<tr>
<td></td><td><h:message for="text1" style="color:red" /> </td>
</tr>
<tr>
<td></td>
<td><h:commandButton value="submit" action="output"/></td>
</tr>
</table>
</h:form>
</f:view>
</body>
</html>
output.xhtml
<!DOCTYPE html PUBLIC "-//W3C//DTD XHTML 1.0 Transitional//EN"
"http://www.w3.org/TR/xhtml1/DTD/xhtml1-transitional.dtd">

<html xmlns="http://www.w3.org/1999/xhtml"
xmlns:h="http://java.sun.com/jsf/html"
xmlns:f="http://java.sun.com/jsf/core">

<head>
<title>JSF 2 html message</title>
</head>
<body>
<h:outputText value="Name : #{userBean.name}" /> <br/>
</body>
</html>
web.xml
<?xml version="1.0" encoding="UTF-8"?>
<web-app xmlns:xsi="http://www.w3.org/2001/XMLSchema-instance" xmlns="http://java.sun.com/xml/ns/javaee" xmlns:web="http://java.sun.com/xml/ns/javaee/web-app_2_5.xsd" xsi:schemaLocation="http://java.sun.com/xml/ns/javaee http://java.sun.com/xml/ns/javaee/web-app_3_0.xsd" id="WebApp_ID" version="3.0">
<display-name>jsfHMessage</display-name>
<welcome-file-list>
<welcome-file>input.xhtml</welcome-file>
</welcome-file-list>
<servlet>
<servlet-name>Faces Servlet</servlet-name>
<servlet-class>javax.faces.webapp.FacesServlet</servlet-class>
<load-on-startup>1</load-on-startup>
</servlet>
<servlet-mapping>
<servlet-name>Faces Servlet</servlet-name>
<url-pattern>/faces/*</url-pattern>
<url-pattern>*.jsf</url-pattern>
<url-pattern>*.xhtml</url-pattern>
</servlet-mapping>
<context-param>
<description>State saving method: 'client' or 'server' (=default). See JSF Specification 2.5.2</description>
<param-name>javax.faces.STATE_SAVING_METHOD</param-name>
<param-value>client</param-value>
</context-param>
<context-param>
<param-name>javax.servlet.jsp.jstl.fmt.localizationContext</param-name>
<param-value>resources.application</param-value>
</context-param>
<listener>
<listener-class>com.sun.faces.config.ConfigureListener</listener-class>
</listener>
<servlet-mapping>
<servlet-name>Faces Servlet</servlet-name>
<url-pattern>*.faces</url-pattern>
</servlet-mapping>
</web-app>
How To Run this Example
After copying the above code paste them to their respective files or by downloading the code from Download Source Code start your web server and then use the following link http://localhost:8181/jsfHMessag/input.xhtml in the address bar of the web browser.
Output :
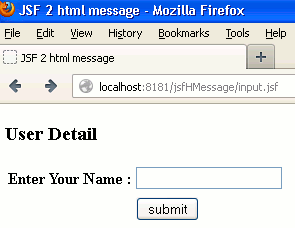
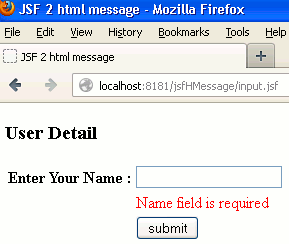
When you will execute the above code you will get the output as follows :
1. The main page will be looked as follows :

2. When you will not entered any characters in the input field and clicked on the submit button then the error message for the corresponding input field will be displayed and the output will be look like as follows :

3. But when you will entered the characters into the input field and clicked on submit button then the output will be as follows :


[ 0 ] Comments